It was a night of revolution on the Route 20 Chess Club ladder, as Nos. 4 and 3 unseated Nos. 1 and 2, respectively. Here's No. 4 taking on (and taking out) No. 1.
Route 20 Chess Club
Freeport, Illinois, Feb. 2, 2010
1.d4 d5 2.c4 Nf6? 3.cxd5 Nxd5 4.e4 Nb4 5.Nf3
For some reason, I thought d4 needed to be protected; I didn't realize that it would be a non-issue after 5.Qa4+ N8c6 6.d5 Nxd5 7.exd5 Qxd5 8.Nc3.
5...e6 6.Qa4+ N4c6 7.Bb5 Bd7 8.Bg5
I pay the price later on for not castling at the first opportunity.
8...Be7 9.h4 f6 10.Be3 a6 11.Bd3
A non-threat, really, when you imagine 11...axb5 12.Qxa8 . . . though getting that queen back out might be tricky.
11...Ne5 12.Qb3 Nxd3+ 13.Qxd3 Bb4+ 14.Nbd2 Bb5
This time Steve misses his ideal opportunity to castle.
15.Qb3 Qd6
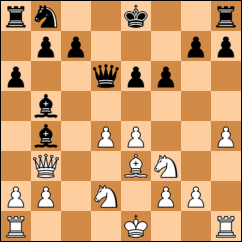
I come to my first real crossroads in the game. So far, I've maintained a slight but consistent advantage. Now I have a choice: play the simple developing move Rc1, or try to turn that slight advantage into something.
16.e5
16.a3 Bxd2+ 17.Bxd2 is probably a better choice.
16...fxe5 17.dxe5
17.Nxe5 Bxd2+ 18.Bxd2 Nc6 19.Nxc6 Bxc6 is an inferior line, handing the slim advantage over to black; the trap contained in 18...Qxd4?? 19.Qxe6+ Kf8 20.Qf7# isn't worth it.
17...Qe7 18.a3
Not as good a play as it was two moves ago. The correct way to press my development advantage is 18.Ng5 Nc6 19.a4 Na5 20.Qxe6 Bd7 21.Qxe7+ Bxe7, which leaves me a pawn up and with much more space. As the imbalances resolve themselves, my advantage begins to melt away.
18...Bxd2+ 19.Bxd2 h6 20.a4
20.Rc1!? Qd7 21.Be3 retains the advantage.
20...Bc6 21.Bb4
21.Nd4 is impossible because of 21...Bxg2 22.Qxe6 Bxh1 23.Qc8+ Kf7 24.e6+ Kg6 25.Qxh8 Nc6 26.Qxa8 Nxd4, a free-for-all in which white ends up with the exchange but the advantage is decidedly black's.
21...Qf7 22.Rd1
I considered castling queenside but thought it was too risky.
22...Bd5 23.Qd3?
I thought I'd played a blunder-free game, but this is an oops, according to Fritz, which recommends the sacrifice 23.Rxd5 exd5 24.Ba3 as restoring positional equality! The justification seems to be that nothing black does can stop 25.Qxb7. In any event, Steve now has a decisive advantage over me, which -- perhaps to my benefit -- I entirely fail to realize.
23...Nc6 24.Ba3 0-0-0 25.Qe3 b6
Steve has a stronger move in 25...Qf5!? 26.0-0 Bxf3 27.Qxf3 Qxf3 28.gxf3 Nxe5 29.Kg2.
26.0-0
I'd been putting this off for a long time, because I knew what was going to happen on f3, but I was running out of options. What I really wanted to play was 26.Ke2, but that was obviously untenable because of the follow-up 26...Bc4+.
26...Bxf3 27.Qxf3?
27.gxf3 is significantly better, but I was afraid of leaving my king that exposed, in light of the likely 27...Qxg6+.
27...Qxf3 28.gxf3 Rxd1 29.Rxd1 Nxe5
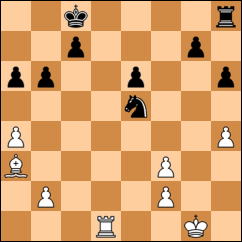
This is the move I failed to think of when I read out the captures, and the reason why the advantage is ultimately Steve's. It's also where I finally began to realize that something, somewhere, had gone wrong.
So now it's endgame. Steve is a pawn up, and my pawn structure is a mess, but at least nothing is passed yet. This gives my king time to bolt for the center and try to even the score. First, though, I have to save what I can.
30.f4 Nf3+ 31.Kf1 Nxh4 32.Ke2 g5 33.Ke3??
I didn't want to exchange on g5 because the prospect of opening up the file for Steve's rook seemed disastrous. Instead, I invited an exchange of pawns on f4. What I missed, though, is that after 33...Ng2+, the f4-pawn is under a double attack, so it won't be an exchange at all, just a theft.
33...Ng2+ 34.Kf3 Nxf4 35.Ke4 b5 36.axb5 axb5 37.b4
Corking Steve's b-pawn and finally freeing my bishop to get into the action.
37...Ne2
After 37...Nh3, my f-pawn is toast.
38.Bb2 Rd8
Steve tries to lure me into trading rooks. I'm three pawns down. I'm not taking the bait. Instead, I have a cunning plan: Noticing that he's finally pulled his rook off defense of the h-pawn, I'm going to try to take it out with my king.
39.Ra1 Kb7 40.Kf3 Nd4+ 41.Kg4 Nf5
So much for that plan -- but I can still get one of those two pawns, at the cost of one of my own.
42.f4 gxf4 43.Kxf4 Rd2 44.Bc3 Rc2 45.Bf6 Rc4+ 46.Ke5 Rxb4 47.Kxe6
I'm out of pawns, and Steve has three. Now's the time to see whether the endgame study I've been doing lately pays off. The first thing I realize is that the h-pawn is an insignificant threat compared with the connected b- and c-pawns. Somehow, I have to stop those, while dodging checks from Steve's knight and rook.
47...Ng3 48.Be7 Rb2 49.Bf6 b4
Did Steve, the deadly exploiter of oversights, really make that move? Did he really hang his rook? Have I, the notorious blunderer, actually managed to hold out against an opponent until he made his crucial error? The answer to all three questions is "yes," so I'd better not screw this up.
50.Bxb2 Kb6 51.Bd4+ c5 52.Bf2
Fritz prefers 52.Be5 Ne4 53.Kd5, but this isn't bad.
52...Ne4 53.Be3 Nc3 54.Kd6
Hemming in Steve's king and preparing to pick off the pawn. Fritz, though, prefers 54.Rf1 Kb5 55.Bxh6.
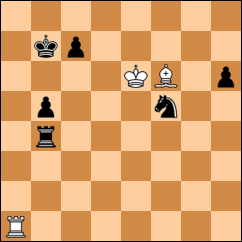
54...Nb5+??
By pursuing the opportunistic check rather than breaking the pin on the c-pawn and covering both pawns with 54...Kb5, Steve commits himself to a dance that will end with a knife in his heart.
55.Kd5 Nc3+ 56.Kc4 Ne4 57.Bxh6 Nd6+ 58.Kd5 Nb5 59.Be3 Nc3+ 60.Kc4 Ne4 61.Rb1 Nd6+
61...Kc6 is black's only chance at counterplay.
62.Kd5 Nb7 63.Rxb4+ Kc7 64.Bxc5 Nd8 65.Bb6+ Kd7 66.Bxd8 Kxd8
It's all over but the cryin'. But Steve isn't going to let me win without making me work for it.
67.Kd6 Kc8 68.Kc6
I missed the ultra-efficient 68.Rb1 Kd8 69.Rb8# here and at several other moments when something analogous would have finished Steve off.
68...Kd8 69.Rb7 Kc8 70.Kb6 Kd8 71.Rc7 Ke8 72.Kc6 Kd8 73.Kd6 Ke8 74.Rd7 Kf8 75.Re7 Kg8 76.Ke6 Kf8 77.Kf6 Kg8 78.Rf7 Kh8 79.Kg6 Kg8 80.Kf6 Kh8 81.Kg5 Kg8 82.Kg6 Kh8 83.Rf8# 1-0
Crude, but effective.


0 comments:
Post a Comment