R.Ekvall–K.Ammann
Route 20 Chess Club
Freeport, Illinois, March 9, 2010
1.d4 d5 2.Nf3 Bf5?! 3.c4 Bxb1
A bit of a gonzo start.
4.Rxb1 e6 5.Bf4 Bd6
Cedes an edge to white, while 5...dxc4 maintains equality. But I have an aversion to the QGA, and I thought it would be interesting to trade off my bishops and try to lock up the position.
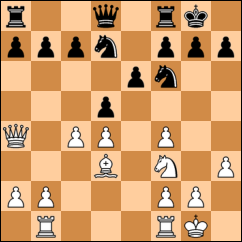
6.e3 Bxf4 7.exf4
I realize too late that I've given Ryan a potential outpost for his knight on e5. Oops. Gonna have to be careful with that. On the other hand, I've also created a good one for myself on e4, so if I can get to it quickly, I can use my f-pawn to keep Ryan's knight away.
I realize too late that I've given Ryan a potential outpost for his knight on e5. Oops. Gonna have to be careful with that. On the other hand, I've also created a good one for myself on e4, so if I can get to it quickly, I can use my f-pawn to keep Ryan's knight away.
7...Nf6 8.Be2 Ne4 9.0-0 Nd7 10.Bd3
Threatening a trade. I don't like what that will do to my pawn structure, so I back off.
10...Nef6 11.Qa4
Failing to press his newly gained advantage. 11.f5 would have been ouchsome.
11...0-0 12.h3
I don't get this move. It covers g4 against my knight, but I don't have any reason to advance that piece; the kingside isn't where the action is right now. The bigger threat, now that I've broken the pin on my knight, is 12...Nb6. 12.c5 would stop that cold.
At this point, I realize that my thinking process has been pretty sloppy so far, and I make a conscious effort to tighten it up.
12...c5
Second-best to 12...Nb6 (I'm still not liking 12...dxc4, no matter what Fritz says). But it has the desired effect -- better, in fact.
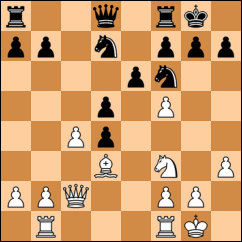
13.Qc2
Ryan could have maintained equality by blowing up the center: 13.dxc5 Nxd5 14.dxc5 Nxc5 15.Bxh7+ Kxh7 16.Qc2+ Kg8.
13...cxd4 14.f5
14.cxd5 is still Ryan's best move, but it's lost some of its potency, because I can easily gain control of the open c-file: 14...Rc8 15.Qa4 Nc5 16.Qxd4 Qxd5.
My next move, 14...Rc8, is almost childishly obvious. But there's a non-obvious move that gains a decisive advantage for black. What is it? (Highlight to reveal answer.)
14...e5!? 15.cxd5 Rc8 (15...e4 16.Bxe4 Rc8 17.Qe2 Re8) 16.Qe2 e4 17.Bxe4 Re8 18.Nd2 Nc5, threatening 19...Nxe4. No, I didn't see it either.
14...Rc8 15.fxe6
Not 15.Nxd4 e5 16.Nb5 a6.
15...fxe6 16.Ng5 Ne4??
Once again, I'm spacing out: Ryan is threatening a fork on e6, and I'm not even seeing it.
17.Nxe6
Time for some serious evaluation of my options. Clearly, if I let Ryan take my queen, I'm sunk. I can evacuate it to h4 and take aim at f2 while also protecting my underdefended d4-knight. Now, how bad is it if I let him take my f8-rook? I lose the exchange, obviously, but I'm up a pawn to begin with. I have my choice of three pieces with which to capture his knight. If I recapture with the c8-rook, I'm giving up a pin but retaining pressure on the f-file, but f2 is too well defended for me to break through at this time. Do I want to let my king be dragged out into the open? Not particularly, which leaves the last option: to retake with the knight. It's left on the edge of the board, but that's not awful, I suppose, since it's my least active piece anyway. So . . . course of action decided.
17...Qh4 18.Nxf8 Nxf8 19.cxd5
Willingly giving up his queen for a passed pawn! Even if the c4-pawn hadn't been pinned, this move is shortsighted: 19.Rfe1 puts unbearable pressure on my knight, forcing him to retreat. 19...Nd6 is then followed up by 20.c5. White has the initiative and owns the e-file free and clear.
There's also another nasty side effect to 19.cxd5, which wasn't even evident to me until I was right on top of it:
19...Rxc2 20.Bxc2 Nd2
Ow. Most unfortunate.
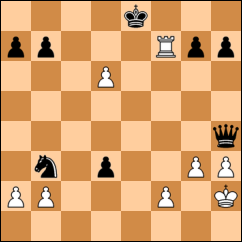
21.d6 Nxf1 22.Rxf1 Nd7
I'm having tunnel vision. I'm thinking about the pawn's promoting. I should be thinking about the seventh-rank outpost square Ryan has just created for his rook. 22...Qf4 would have neutralized this strategic threat.
23.Re1 Kf8 24.Re7
Now the knight is hanging, and I'm forced to get creative again.
24...Nc5
It's better with the in-between move 24...Qh6 25.Ba4 (25.Rxd7 Qc1+ 26.Kh2 Qxc2) Nc5.
25.Bb3 d3 26.Rf7+ Ke8
I ruled out 26...Kg8 on the basis of 27.Rf4+ Nxb3 28.Qxh4. But if I'd thought one move further ahead, I might have seen 28...d2! There was nothing to fear.
27.Kh2 Nxb3 28.g3
Cheeky counterplay! I studied this position for a bit but didn't think of the very best move, 28...Qd4, which is mate in 10 -- or any other straightforward queen evacuations, for that matter. But I did see something that made me laugh: a way to defuse the tension in the position and maintain my material advantage at the same time. What the hell, I thought.
28...d2!? 29.gxh4 d1Q
"The Zombie Queen will not stay dead!" I proclaimed. (If I'd been less amused with myself, however, I might have noticed that the Zombie Queen could have rested in peace for a move while I snagged the hanging rook with 29...Kxf7.)
30.d7+ Kd8
I don't know why I failed to notice that the pawn's promoting is no threat after 30...Kxf7.
31.axb3 Qxb3 32.Rxg7 Qxb2 33.Rg2 Qe5+ 34.Rg3 Kxd7
One less thing to worry about.
35.f4? Qxf4 36.h5
Now is the time on Sprockets when we dance:
36...Qf2+ 37.Rg2 Qf4+ 38.Rg3 b5 39.Kg2 Qe4+ 40.Rf3 b4 41.Kg3 Qe5+ 42.Rf4 b3 43.Kg4 Qe2+ 44.Kg5 Qe5+ 45.Rf5
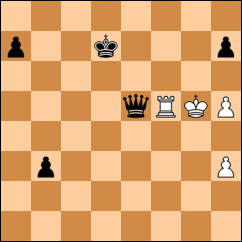
What should black do? (Highlight to reveal answer.)
45...Qxf5!+ 46.Kxf5 b2 47.Kf6 Kd6 48.Kg7 b1Q
"Dude," I said, "I warned you about that Zombie Queen!"
49.Kh6 Ke5 50.h4 Qb6+
Overanxious to avoid stalemate, I overlooked the neat 50...Qb7 51.Kg5 Qg7#.
51.Kxh7 Qf6
Another missed mate: 51...Kf6 52.h6 Kf7 53.h5 a5 54.Kh8 Qxh6#.
52.h6 Kf5
Another missed mate: 52...Qf7+ 53.Kh8 a5 54.h5 a4 55.h7 Qf8#. I could make a book of these, or at least a pamphlet. But I won't bore you with any more of them here.
53.h5 Kg5 54.Kg8 Kxh5 55.h7 Qg6+ 56.Kh8
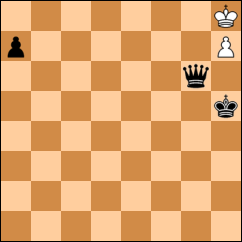
What do you think is going to happen? No peeking, now.
56...Qxh7! 57.Kxh7 a5 58.Kg7 a4 59.Kh7 a3 60.Kg8 Kg6 61.Kf8 Kf6 62.Kg8 a2 63.Kh7 a1Q
"The Zombie Queen . . . will not . . . stay . . . dead!"
64.Kh6 Qh1# 0-1


0 comments:
Post a Comment